Instructions
This job aid is to be used within Express Billing in order to attach documents to an invoice, with the added option of automatically emailing the attached documents to the customer along with the invoice.
This process is to be done before moving an invoice to Ready (RDY) status.
1) From the BFS Home Page, click the 'Credit to Cash' tile button

2) Navigate to the Express Billing page
3) From the Express Billing page, verify that the invoice is in a 'New' status

4) In the Address section of the Customer Information section, select 'Email Invoice as Attachemnt' in the Invoice Media drop down menu

It is now possible to add the supporting documents to the invoice at the header and line level, which will be shared as email attachments along with the invoice after the invoice has been processed.
5) Navigate to the Supporting Documentation page
6) From the Supporting Documentation page, you can attach documents at the header level by clicking the 'Upload' button
- Make sure not to check the 'Internal Only' check box, as this will set the supporting documentation as internal documentation and thus will not be attached or shared via email
- You can view the attached documentation by using the 'View' button
- If you want to add multiple documentation files, click on the '+' button, and then use the upload button of the new row to attach a file
- If you want to delete an attachment that is already uploaded, click on the '' icon of that row

7) If you would like to add attachemnts at the line level, click the 'Line Documentation' tab

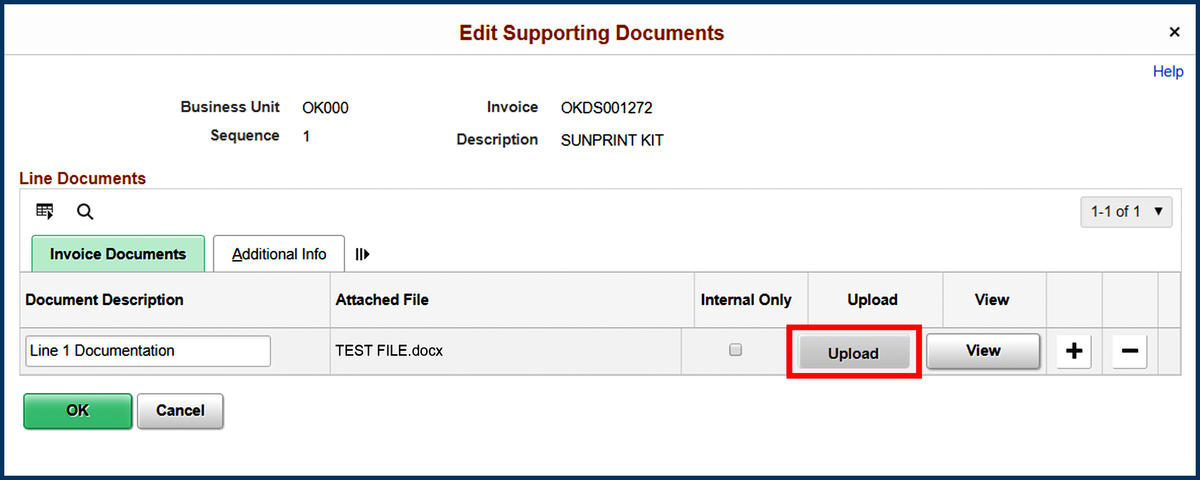
8) For each line, you can attach supporting documents by clicking the 'Edit Supporting Documents' link

This will open the Edit Supporting Documents window.
9) Attach the supporting documents at the line level by clicking the 'Upload' button
- Make sure to uncheck the check box as it will be checked by default
- Click the 'View' button to view the attachment that is being uploaded
- Click the 'OK' button after uploading the attachment

10) From the Line Documentation tab, click the 'Save' button to save the changes

11) Navigate back to the Express Billing page and switch the Bill status to Ready (RDY)

Now we are ready to finalize and process the invoice.
To do this, we will need to navigate to the Single Action Invoice page.
- From the Express Billing page, click the 'Generate Invoices' button
- From the Generate Invoices page, click the 'Non-Consolidated' button
- From the Non-Consolidated page, click the 'Single Action Invoice' button
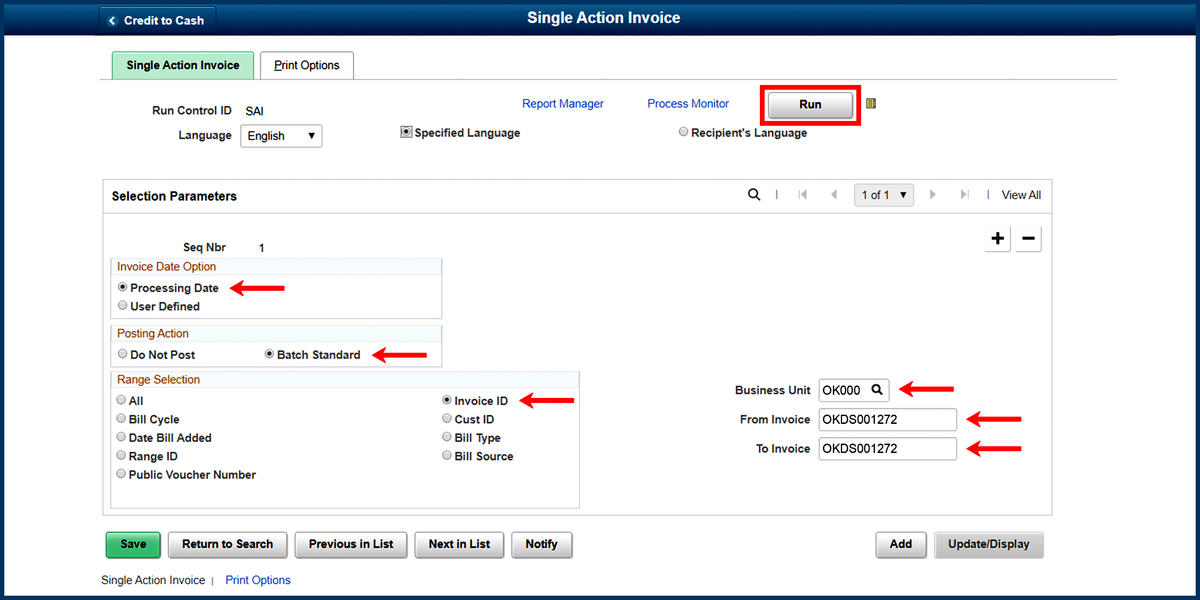
12) From the Single Action Invoice page, there are three sectios to complete
- Invoice Date: In the Invoice Date section, select the 'Processing Date' option if you would like the system to set the processing date to be the 'Invoice Date' that will be included on the invoice
- Posting Action: In the Posting Action section, select the 'Batch Standard' option if you would like the system to assign the posting action of batch standard to the pending items that are created by this job
- Range Selection: In the Range Selection section, select the 'Invoice ID' option and fill out the 'Business Unit,' 'From Invoice,' and 'To Invoice' fields, since we are running one invoice
13) Once these sections have been completed and filled out, click the 'Run' button at the top of the page

14) From the Process Scheduler Request, select the 'UC Single Action Invoice' check box, and click the 'OK' button

15) Click the 'Process Monitor' link and then wait until the process Run Status displays as 'Success' and the Distribution Status displays as 'Posted'

At this point you should receive an email with the attached supporting documentation along with the invoice.

